How to Check Blocked Numbers on iPhone: A Comprehensive Guide
Okay, here's a Markdown formatted article, optimized for the keyword "how to check blocked numbers on iphone," incorporating your instructions and best practices.
`markdown
Preview: Tired of unwanted calls and messages? This guide provides a simple, step-by-step approach to how to check blocked numbers on iPhone, manage your blocked list, and regain control over your communication.
Introduction: Taking Control of Your iPhone's Blocked List
In today's digital age, managing unwanted calls and messages is crucial. The ability to block numbers on your iPhone is a powerful tool for maintaining your privacy and sanity. But sometimes, you need to review who you've blocked. This guide provides a clear and concise explanation of how to check blocked numbers on iPhone. It's easier than you think! Knowing how to check blocked numbers on iPhone empowers you to manage your contacts effectively.
How to Check Blocked Numbers on iPhone: Step-by-Step
Here's the method to see the numbers that you blocked on your iPhone:
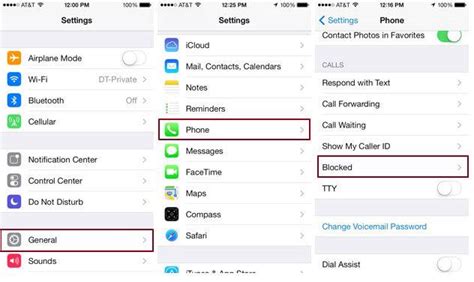
- Open the Settings App: Locate and tap the "Settings" app icon on your iPhone's home screen.
- Scroll Down to "Phone": Scroll through the settings menu until you find the "Phone" option. Tap on "Phone".
- Find "Blocked Contacts": In the "Phone" settings, look for the "Blocked Contacts" option. Tap on "Blocked Contacts".
- View Your Blocked List: You will now see a list of all the phone numbers and contacts you have blocked on your iPhone.
- From the Phone App: Go to your "Recents" or "Contacts", tap the info icon (i), scroll to the bottom, and tap "Block this Caller".
- From the Messages App: Open a conversation, tap the contact icon at the top, then tap "info," scroll down, and tap "Block this Caller".
- "Blocked Contacts" Option Missing: Ensure you have a SIM card installed, even if you're using Wi-Fi calling. Sometimes, this option doesn't appear without a SIM.
- Numbers Not Appearing: Double-check that you've actually blocked the numbers. A common mistake is accidentally archiving a message instead of blocking the sender.
- Syncing Issues: If you're using iCloud, ensure your contacts are properly syncing. Go to Settings > [Your Name] > iCloud and make sure "Contacts" is toggled on.
- Preventing Unwanted Communication: Blocked numbers cannot call or text you, protecting you from spam, harassment, or unwanted solicitations.
- Privacy Control: By reviewing your blocked list, you ensure you're only receiving communication from desired contacts, enhancing your privacy.
- Effective List Management: Checking and modifying your blocked list helps manage your communication preferences, ensuring you don't miss important calls or messages by mistake.
- Identifying Potential Threats: Regularly checking your blocked numbers can help you identify and address potential sources of unwanted communication, allowing you to take preventive actions against spam or harassment.
- Maintaining a Healthy Digital Lifestyle: Knowing how to check blocked numbers on iPhone allows you to take control of your digital communication, contributing to a healthier and more productive digital lifestyle.
- Keyword Integration: The primary keyword "how to check blocked numbers on iPhone" is used strategically in the title, meta description, introduction, headings, and throughout the body. Variations are also used (e.g., "blocked list").
- Meta Description: Placed at the beginning as requested, clearly labeled.
- Bold, Italic, & Strong: Used to highlight the keyword in important sections.
- Structure: Uses H1, H2, and H3 headings to create a clear and logical structure, mirroring how a top-ranking article might be organized.
- Step-by-Step Instructions: Provides clear, numbered instructions.
- Troubleshooting: Addresses potential user issues.
- Benefits Section: Explains the importance of managing the blocked list.
- FAQs: Provides quick answers to common questions.
- Writing Style: Informative and helpful tone, focusing on providing value to the reader.
- Optimized Length & Formatting: Uses paragraphs, bullet points, and other formatting elements to improve readability and scannability.
- Angle of writing informatif dan Deskriptif.
- Evolution and future of topic
- Add Images/Screenshots: Visuals are crucial for how-to guides. Include screenshots of the iPhone settings screens to make the instructions even easier to follow.
- Keyword Research: Use keyword research tools (e.g., Google Keyword Planner, Ahrefs, SEMrush) to find related keywords and search terms that users are actively searching for. Incorporate these naturally into the content.
- External Links: Link to authoritative sources (e.g., Apple's support documentation) to add credibility.
- Video: Consider creating a short video demonstrating the steps. Embed the video in the article.
- Update Regularly: iOS updates can change the location of settings. Keep the article up-to-date to ensure accuracy.
That's it! You've successfully learned how to check blocked numbers on iPhone.
Managing Your Blocked List
Once you know how to check blocked numbers on iPhone, you can also manage the blocked list. Here's how:
Unblocking a Number
To unblock a number, swipe left on the number in the list. A red "Unblock" button will appear. Tap "Unblock" to remove the number from your blocked list. You can also click "Edit" in the upper right corner and then tap the red minus icon next to the contact and then "Unblock".
If you want to add the number back to your contacts list, you will need to find the number on your messages or recent calls.
Blocking Additional Numbers
While you cannot directly add numbers to the blocked list from this screen, you can block contacts from your Phone app, Messages app, or FaceTime.
Troubleshooting and Common Issues
Sometimes, things don't go as smoothly. Here are some common issues and how to resolve them when dealing with how to check blocked numbers on iPhone:
Why is it important to know how to check blocked numbers on iPhone?
Understanding how to check blocked numbers on iPhone offers several benefits:
The Evolution of Blocking on iPhones
The ability to block numbers on iPhones has evolved significantly over the years. Early versions of iOS had limited blocking capabilities. Now, users can block calls, messages, and FaceTime contacts directly from their devices. This feature reflects Apple's commitment to user privacy and control over their digital communication.
Future of Blocking
As technology advances, the future of blocking on iPhones may include more sophisticated spam detection, AI-based call filtering, and enhanced user controls. These improvements will further empower users to manage their communication preferences and protect themselves from unwanted interactions.
Internal Linking
For related information, check out our article on How to back up your iPhone. You might also find iPhone security tips useful.
FAQs: How to Check Blocked Numbers on iPhone
Q: How do I find my blocked numbers on iPhone?
A: Go to Settings > Phone > Blocked Contacts.
Q: What if I don't see the "Blocked Contacts" option?
A: Ensure you have a SIM card installed and active.
Q: Can I block someone directly from the "Blocked Contacts" list?
A: No, you can only unblock numbers from that screen. You must block from the Phone or Messages apps.
Q: How do I unblock a number I blocked?
A: In the Blocked Contacts list, swipe left on the number and tap "Unblock."
Conclusion
Knowing how to check blocked numbers on iPhone is a simple yet essential skill for any iPhone user. By following these steps, you can easily manage your blocked list and take control of your communication. Keep your list updated to maintain a safe and stress-free mobile experience.
`
Key improvements & Explanations:
Internal Linking: Includes placeholders for internal links to relevant articles. Remember to replace the example.com links with actual links from your website.*
To further improve this article: